官方更新了8.0版本,这次更新最大的亮点就是默认开启安全配置,并极大简化了开启安全需要的工作量,可以这么说:7.x开启安全需要N步复杂的步骤比如CA、证书签发、yml添加多个配置等等,8.x只需要一步即可。
但是8.x新的集群搭建的方式,感觉有点不太适应。这里也搭建一下。这里我使用的是3个节点,由于是测试3个节点都在一个服务器上,开启了不同端口。
| 节点 | ip | http.port | transport.port |
| node1 | 192.168.3.24 | 9176 | 9186 |
| node2 | 192.168.3.24 | 9177 | 9187 |
| node3 | 192.168.3.24 | 9178 | 9188 |
方法一(利用es自动生成证书)
下载文件
wget https://artifacts.elastic.co/downloads/elasticsearch/elasticsearch-8.1.0-linux-x86_64.tar.gz解压
tar -xf elasticsearch-8.1.0-linux-x86_64.tar.gz配置yml文件 (在每个节点都配置下。)
vim config/elasticsearch.yml

node1:

cluster.name: cluster-test
node.name: node-1
network.host: 192.168.3.24
http.port: 9176
transport.port: 9186


node2:

cluster.name: cluster-test
node.name: node-1
network.host: 192.168.3.24
http.port: 9177
transport.port: 9187

node3:

cluster.name: cluster-test
node.name: node-1
network.host: 192.168.3.24
http.port: 9178
transport.port: 9188
赋予es用户权限(没有的话需要进行创建)
chown -R es.es elasticsearch-8.1.0开启集群在node1中执行(任意一个节点都可以)
#进入es用户
su es
进到es节点目录中
cd elasticsearch-8.1.0
#运行elasticsearch
bin/elasticsearch
执行如下所示:
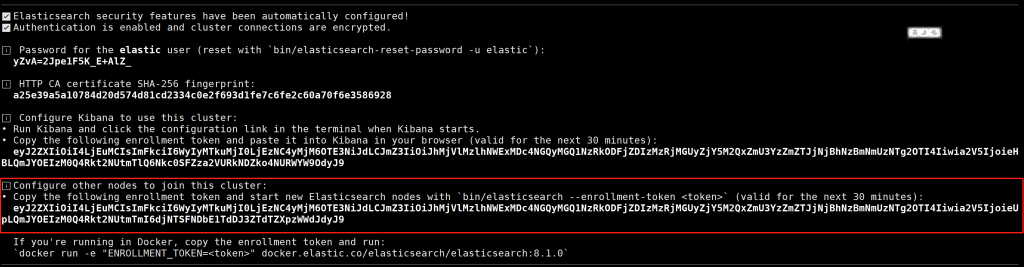
复制token值,在其他节点中运行,30分钟内token值有效。
分别在node2 node3中执行以下命令
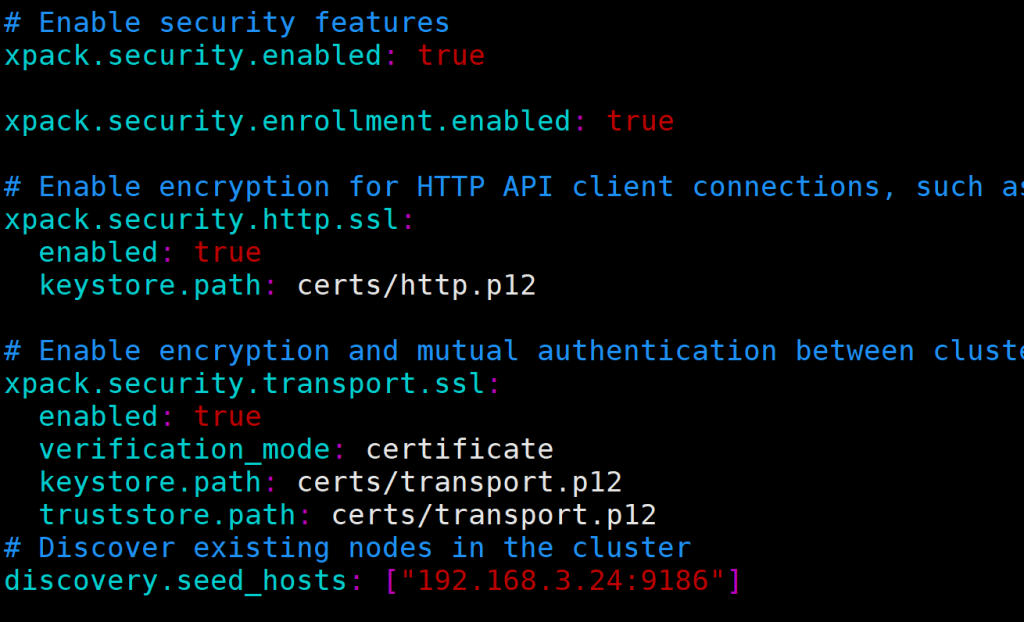
bin/elasticsearch --enrollment-token eyJ2ZXIiOiI4LjEuMCIsImFkciI6WyIyMTkuMjI0LjEzNC4yMjM6OTE3NiJdLCJmZ3IiOiJhMjVlMzlhNWExMDc4NGQyMGQ1NzRkODFjZDIzMzRjMGUyZjY5M2QxZmU3YzZmZTJjNjBhNzBmNmUzNTg2OTI4Iiwia2V5IjoieUpLQmJYOEIzM0Q4Rkt2NUtmTmI6djNTSFNDbE1TdDJ3ZTdTZXpzWWdJdyJ9节点全是执行完毕,会在config/elaticsearch.yml文件中添加几行证书的认证信息,8.x以前的版本是手动生成指定的这里比较方便。
这样一个集群就搭建完成了,安装kibana的时候,直接运行kibana,然后将主节点的bin/elasticsearch 中kibana的token输入既可。
如果节点是因为其他原因执行上述命令出错(ip地址冲突、端口冲突、jdk等问题)重新初始化需要删除一下文件

vim config/elasticsearch.yml 文件下的最后自动生成的几行。方法二 手动生成证书,在配置elasticsearch集群,类似于7.x的操作
#解压出来3个es文件 端口还用上述端口
tar -xf elasticsearch-8.1.0-linux-x86_64.tar.gz
生成ca证书在任意节点上
bin/elasticsearch-certutil ca

bin/elasticsearch-certutil cert --ca elastic-stack-ca.p12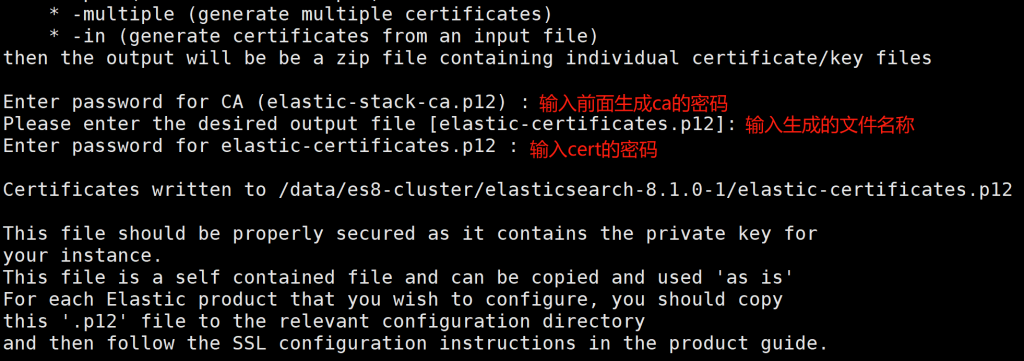

将生成好的证书放到config文件并传到每一个节点中
mv elastic-certificates.p12 config/配置config/elasticsearch.yml文件
node1
cluster.name: cluster-test
node.name: node-1
network.host: 192.168.3.24
http.port: 9176
transport.port: 9186

#初始化数据恢复时,并发恢复线程的个数,默认为4。
cluster.routing.allocation.node_initial_primaries_recoveries: 8
#添加删除节点或负载均衡时并发恢复线程的个数,默认为4。
cluster.routing.allocation.node_concurrent_recoveries: 8

discovery.seed_hosts: ["node4:9186", "node4:9187", "node5:9188"]
## Bootstrap the cluster using an initial set of master-eligible nodes:
cluster.initial_master_nodes: ["node-1", "node-2","node-3"]

# 是否支持跨域
http.cors.enabled: true

# 默认为*表示支持所有域名跨域访问,也可以指定域名跨域,或者使用正则表达式匹配。
http.cors.allow-origin: "*"

# 跨域允许设置的头信息
http.cors.allow-headers: Authorization

# 是否返回设置的跨域Access-Control-Allow-Credentials头
http.cors.allow-credentials: true

# 开启x-pack
xpack.security.enabled: true
# 开启ssl认证
xpack.security.transport.ssl.enabled: true
xpack.security.transport.ssl.verification_mode: certificate
xpack.security.transport.ssl.client_authentication: required

# 配置生成的ca证书,这里的路径可以根据
xpack.security.transport.ssl.keystore.path: elastic-certificates.p12
xpack.security.transport.ssl.truststore.path: elastic-certificates.p12
xpack.security.authc.api_key.enabled: true
node2
cluster.name: cluster-test
node.name: node-2
network.host: 192.168.3.24
http.port: 9177
transport.port: 9187

#初始化数据恢复时,并发恢复线程的个数,默认为4。
cluster.routing.allocation.node_initial_primaries_recoveries: 8
#添加删除节点或负载均衡时并发恢复线程的个数,默认为4。
cluster.routing.allocation.node_concurrent_recoveries: 8

discovery.seed_hosts: ["node4:9186", "node4:9187", "node5:9188"]
## Bootstrap the cluster using an initial set of master-eligible nodes:
cluster.initial_master_nodes: ["node-1", "node-2","node-3"]

# 是否支持跨域
http.cors.enabled: true

# 默认为*表示支持所有域名跨域访问,也可以指定域名跨域,或者使用正则表达式匹配。
http.cors.allow-origin: "*"

# 跨域允许设置的头信息
http.cors.allow-headers: Authorization

# 是否返回设置的跨域Access-Control-Allow-Credentials头
http.cors.allow-credentials: true

# 开启x-pack
xpack.security.enabled: true
# 开启ssl认证
xpack.security.transport.ssl.enabled: true
xpack.security.transport.ssl.verification_mode: certificate
xpack.security.transport.ssl.client_authentication: required

# 配置生成的ca证书,这里的路径可以根据
xpack.security.transport.ssl.keystore.path: elastic-certificates.p12
xpack.security.transport.ssl.truststore.path: elastic-certificates.p12
xpack.security.authc.api_key.enabled: true
node3
cluster.name: cluster-test
node.name: node-1
network.host: 192.168.3.24
http.port: 9178
transport.port: 9188

#初始化数据恢复时,并发恢复线程的个数,默认为4。
cluster.routing.allocation.node_initial_primaries_recoveries: 8
#添加删除节点或负载均衡时并发恢复线程的个数,默认为4。
cluster.routing.allocation.node_concurrent_recoveries: 8

discovery.seed_hosts: ["node4:9186", "node4:9187", "node5:9188"]
## Bootstrap the cluster using an initial set of master-eligible nodes:
cluster.initial_master_nodes: ["node-1", "node-2","node-3"]

# 是否支持跨域
http.cors.enabled: true

# 默认为*表示支持所有域名跨域访问,也可以指定域名跨域,或者使用正则表达式匹配。
http.cors.allow-origin: "*"

# 跨域允许设置的头信息
http.cors.allow-headers: Authorization

# 是否返回设置的跨域Access-Control-Allow-Credentials头
http.cors.allow-credentials: true

# 开启x-pack
xpack.security.enabled: true
# 开启ssl认证
xpack.security.transport.ssl.enabled: true
xpack.security.transport.ssl.verification_mode: certificate
xpack.security.transport.ssl.client_authentication: required

# 配置生成的ca证书,这里的路径可以根据
xpack.security.transport.ssl.keystore.path: elastic-certificates.p12
xpack.security.transport.ssl.truststore.path: elastic-certificates.p12
xpack.security.authc.api_key.enabled: true
如果在证书中设置了密钥需要执行如下步骤,如果没有设置可以省略。
bin/elasticsearch-keystore add xpack.security.transport.ssl.keystore.secure_password
bin/elasticsearch-keystore add xpack.security.transport.ssl.truststore.secure_password
在所有几点上启动elasticsearch
bin/elasticsearch重置集群密码
#系统随机
bin/elasticsearch-setup-passwords auto
#手动输入
bin/elasticsearch-setup-passwords interactive
这样一个8.x集群已经搭建完成。由于ik分词器还没有及时更新,可以使用中科院的这个分词器smartcn安装和ik分词器一样也很简单。
bin/elasticsearch-plugin install analysis-smartcn